ACROW SHORE PROP SIZE 00
LITE “A” SCAFFOLD SYSTEM
Technical and Safety Information
View this page in pdf format (download/print)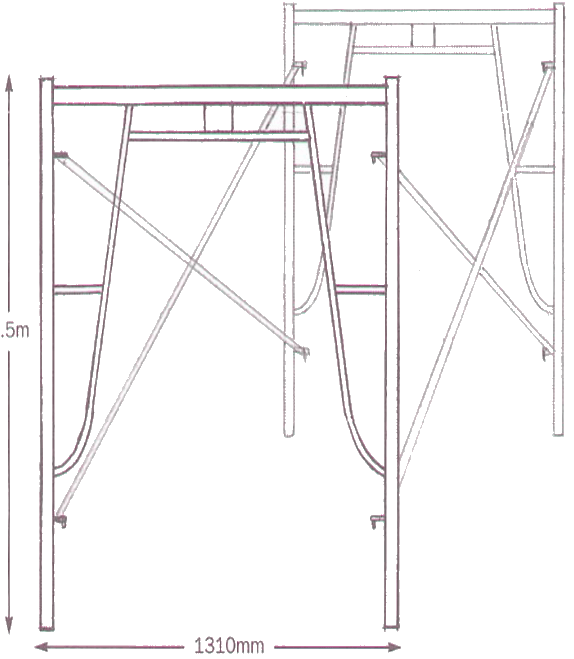
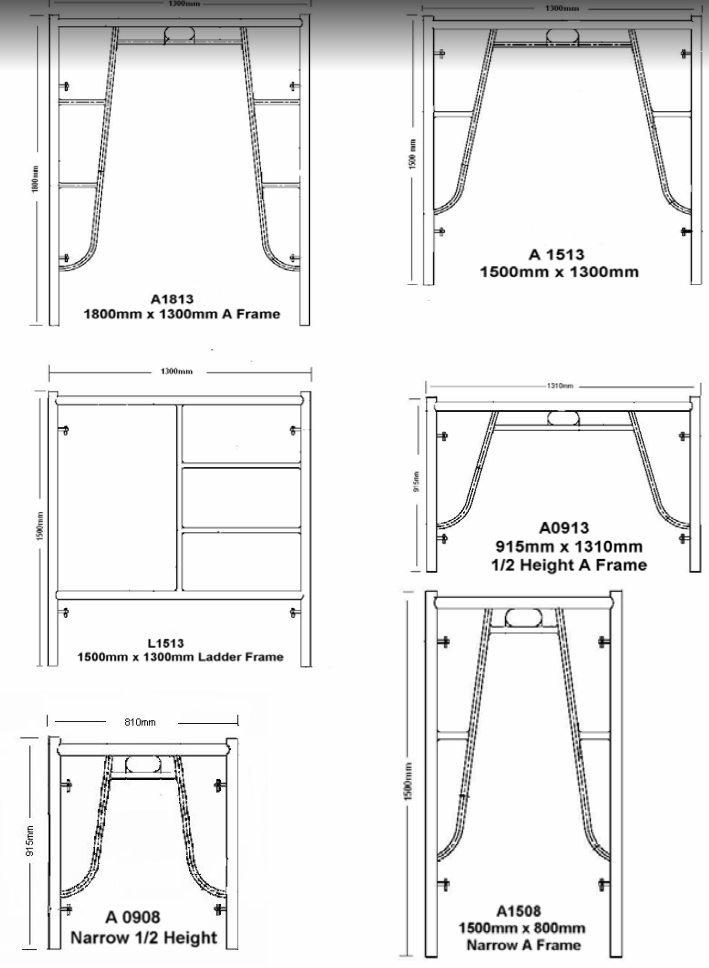
Lite “A” Scaffold Frames
Erecting Lite “A” Scaffold
Note: A0913 frames can be incorporated into bays of A1813, A1513 and L1513 frames, except for the first lift (bottom lift)
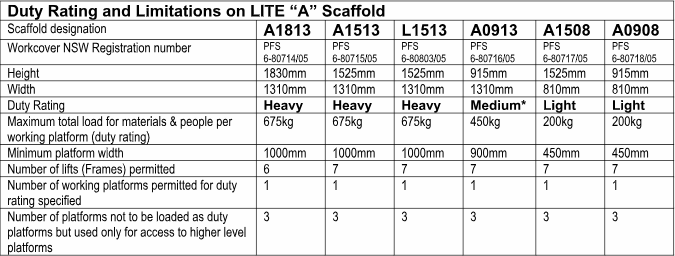
Note: The duty ratings in the table are as specified by AS/NZS 1576.1: 1995, clause 2.4.3.2
STABILITY OF LITE “A” FREESTANDING SCAFFOLD
Lite “A”— A1813, A1513 and L1513 designated scaffolds using 1310 mm wide frames can be erected to one lift high (1.8 metres to the platform) with screw jacks extended to 350 mm maximum extension and comply with the stability requirements of AS/NZS 1576.1.
Lite “A”— A1813, A1513 and L1513 designated scaffolds using 1310 mm wide frames erected to more than one lift high requires additional measures to ensure stability of the scaffold.
Lite “A” — A0913 designated scaffolds using 1310 mm wide frames can be erected to two lifts high (1.8 metres to the platform) with screw jacks extended to 350 mm maximum extension and comply with the stability requirements of AS/NZS 1576.1.
Lite “A”— A1508 and A0908 scaffolds using 810 mm wide frames require additional measures to ensure stability for all lifts.
Measures to control instability and prevent possible toppling of scaffolds include;
- Ties to a permanent structure (a building)
- Scaffold tubes butting against rigid walls
- Outriggers thrusting onto a hard surface such as concrete. Where a hard surface is not available the outrigger must thrust against a scaffold plank firmly resting on the ground
Note: Only competent persons are to erect scaffold. A qualified (Ticketed) scaffolder is required to erect any scaffold over 4 meters in height or where complex configurations are involved.
1. TRANSPORTATION
1.1 When transporting scaffolding equipment by motor vehicle always ensure that it is loaded in a safe manner and tightly strapped to the vehicle. If frames cannot be loaded flat on the tray of the vehicle load the frames in a vertical position with the cross member at the bottom, to ensure that the heaviest part of the frame is at the lowest point. Where frames are loaded flat on the tray, try to ensure that the frames and other equipment are stacked lower than the side of the vehicle to prevent it coming off in the event that it should slide.
Note: Scaffold may come loose in its straps throughout the journey so always stop and check your straps regularly.
1.2 When transporting plant by hand to the setup site ensure there is a clear path with enough space to safely carry your equipment without any risk of tripping or falling. Any open holes should be securely covered with plywood of appropriate strength or with scaffold planks. Steps or rises along the path should be noted and marked if possible.
Note: When moving scaffolding equipment always apply OHS manual handling techniques. If you do not know what these are, ask your employer for instructions.
2. MAKING SURE YOUR ERECTION SITE IS SAFE
2.1 Make a thorough examination of the approaches and surroundings of the site before taking the plant to the erection site.
2.2 There are minimum distances that scaffold may be setup in proximity to power lines, slab edges and other such hazards.
2.3 Scaffold must not be erected within 1 metre of an exposed edge. This applies to balconies fitted with a railing, where the drop from the scaffold platform exceeds 2 metres.
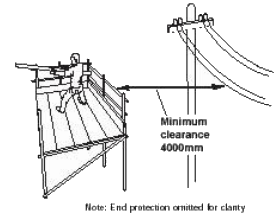
2.4 A scaffold must not be erected within 4 metres of low voltage power lines, such as to a residence. Where it is necessary to erect a scaffold closer than 4 metres to low voltage power lines or where there is doubt of the voltage, do not proceed without written authority from the local power supply authority. Note: Victorian regulations require clearances of 4.6 metres horizontally and 5 metres vertically from overhead wires
2.5 Uncontrolled vehicle movement such as forklifts, cars, cranes, etc. in close proximity to your scaffold is a hazard that may lead to your scaffold structure becoming unstable or even collapsing. Where vehicle hazards are possible you should provide protective buffers, re- route traffic or have traffic control on site.
2.6 Use safety signs to warn others of any dangers on site.
3. ERECTION METHOD
3.1 At all times a minimum of two people are required to erect
Lite “A” scaffold. Lite “A” scaffold component list and unit weight.
| A1813 Fame | 20.4kg |
| A1513 Fame | 16.2kg |
| A0913 Fame | 12.6kg |
| A1508 Fame | 14.8kg |
| A0908 Fame | 1.0kg |
| L1513 Fame | 7.5kg |
| Fame Joiner | 0.5 kg |
| Guard Rail Post | 3.0 kg |
| Guard Rail Corner Post | 3.0 kg |
| Guard Rails: Sides | 2.5 kg |
| Guard Rails: Ends | 2.5 kg |
| Braces | 5.6 kg |
| Screw-jacks | 3.4 kg |
| Metal Planks | 10.5 Kg |
3.2 Make sure the base (ground) is firm and free of debris in the area of setup. When erecting scaffold on soil use sole boards (scaffold planks not less than 220mm wide). If the ground is not level use screw jacks. If jacks are not needed, always use base plates where the scaffold is erected on sole boards or where a concrete surface can be damaged by the ends of the scaffold frames.
A scaffold must not be erected on soft ground or unconsolidated soil.
3.3 Do not use any component that shows signs of damage. Always check to make sure all components are well maintained and suitable for use.
3.4 When erecting a scaffold, develop a methodical work sequence that:
- Allocates specific tasks to each scaffolder
- Agrees on a method of communication
- Ensures that work is properly secured
- Minimises the risk of accidents
Note: Seek expert advice if the scaffold is to be set up in an unusual area such as a roof,
balcony etc.
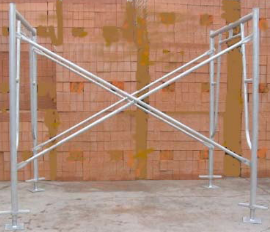
3.5 Erect one bay, one lift high, in the appropriate position, using screw jacks if required for leveling making sure to double brace. Continue adding as many bays as required by inserting joint pins on the top of each “standard” (frame leg) and add additional frames.
Note: Scaffold frames must always be double braced (braced on both sides).
3.6 A SIMPLE GUIDE TO ERECTING LITE “A” SCAFFOLD
3.6.1
Lay one frame horizontally on ground and insert screw jacks into legs of frame.
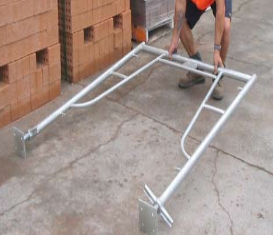
3.6.2
Raise frame vertically with screw jacks in place
3.6.3
Whilst one person holds the frame vertically, the second person fits a brace to the frame starting with the top fitting first, then the bottom, ensuring frame toggle pin locks are in the locked vertical position once the brace has been inserted
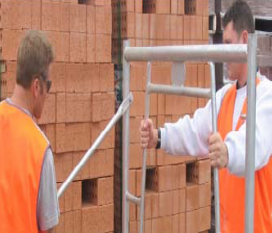
3.6.4
Fit the second brace to the opposite side of the frame also ensuring frame toggle pin locks are in the locked position once the brace has been attached.
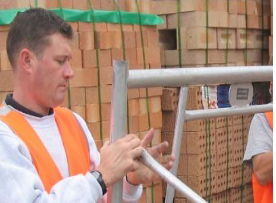
3.6.5
Ensure that all toggle pin locks are in the locked.
3.6.6
The frame can now be lowered and gently rested on the unattached braces.
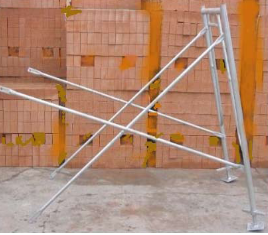
3.6.7
Repeat steps 3.6.1, 3.6.2, 3.6.3, and 3.6.4 on second frame. The bay is now stable and self-supporting.
3.6.8
1. Place one of the captive metal planks across the centre of the transoms, with the aid of a sprit -level; adjust screw jacks on all frames until centre plank is level.
2. Ensure bay is square and parallel with building.

3.6.9
Repeat steps 3.6.1, 3.6.2, 3.6.3, and 3.6.4 on second frame. The bay is now stable and self-supporting.
Note:
All planks should be hard against working face side, with the 80mm gap left on opposite side to working face for side toe board to be included at 45% degree angle once guard rails and side toe boards have been added. (see 3.6.14.3)
3.6.10
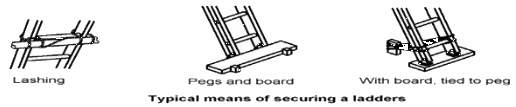
Fix ladder securely to the Ladder Access Frame and ground in accordance with Australian Standard AS/NZS 1576.6:2000 5.6 Access For Working Platforms. Examples include:
3.6.11 Guardrails, midrails and toe boards (kick boards) must be used on any bay erected higher than 1.8m high above the surrounding ground. This applies also while erecting the scaffold.
3.6.12
For 1 scaffold bay/tower, fit 4 Lite A guardrail corner posts at each corner. For 2 or more bays, add corner posts at each end and use Lite A guardrail posts in the centre.
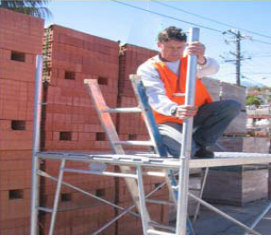
3.6.13
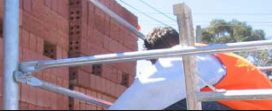
Fit top and mid guardrails to all open sides of platform ensuring that all toggle pin locks are in the locked position as shown in 3.6.5

3.6.14
Fit all toe boards in the following order…
3.6.14.1
- Start at “working face” side using a Lite A standard steel captive plank, placed tread on in side of the working platform between corner posts
- Repeat for none working face side
3.6.14.3
Push down from the top of the “none working face” toe board into gap at a 45% angle ensuring that the end toe boards lock it into position with the side toe boards and platform. Check for positive fit and that there is no gap in the platform.

3.6.15
In every bay, tie the top lift and every second lift to the structure. Measures to control instability and prevent possible toppling of scaffolds include;
- Ties to a permanent structure (a building)
- Scaffold tubes butting against rigid walls
- Outriggers thrusting onto a hard surface such as concrete. Where a hard surface is not available the outrigger must thrust against a scaffold plank firmly resting on the ground
4. DURING USE
4.1 Once the scaffold has been erected and accepted as a work platform the users are responsible for using the scaffold in a way that minimises risk to themselves and others. Your employer must ensure you have sufficient knowledge or experience to do so.
4.2 Any materials placed on scaffold should always be as close to the frames as possible. Make sure that such material cannot fall off the platform over the toe board.
4.3 Any build up of material or debris should be monitored and progressively removed. Debris generated during use should be confined within the working platform. Working debris must not be allowed to fall from the working platform. Use chutes for debris or lower things by hoist or by hand.
4.4 When using electrical leads or equipment on scaffolding, always ensure that they are tagged with a recent date inspection tag and are in good working order.
Note: Scaffolding is made from steel and is electrically conductive. Any faulty electrical equipment on the scaffolding could result in a fatal injury.
4.5 Where scaffold stands in close proximity to power lines, the handling of reinforcing steel rods and other long metal items should be carried in a manner that preserves the safe minimum distance of 4 metres from the power lines.
5. ADVERSE WEATHER
5.1 In adverse weather conditions such as rain or snow special precautions should be taken to ensure that work could be done safely. You may need a safety harness when working on a slippery platform. Do not work on a scaffold in high winds.
6. AFTER USE AND DISMANTLING
6.1 Once finished with the scaffold make sure any unused material, scraps and rubble are cleaned or removed from the scaffold prior to dismantling.
6.2 When dismantling the scaffold work from top to bottom starting at one end and working towards the other end one bay at a time. All pieces must be passed down one bay at a time. Do not drop or throw scaffolding as it could result in the injury of others or damage to the equipment.
6.3 The first things removed should be midrails (step 1) and guardrails (step 2) followed by the guardrail post (step 3). The planks from one platform should be removed through the same bay underneath (step 4).
It is a good precaution to wear safety glasses as any debris missed in the clean up could fall in you eyes.
Once the planks are removed off the first platform in a bay the braces, at the next level below, for that bay may be removed (step 5) and the outside frame passed down (step 6). The next bay along at the upper level can be removed using the same sequence (steps 7, 8, 9, 10,11 and 12).
Note: See picture below numerically marked in order of removal. Steps 1 to 6 are for the upper level first bay and steps 7 to 12 are for the upper level second bay.
Complete the removal of all items from one level before starting on the lower levels. The remainder of the scaffold is dismantled following this pattern, working from one end to the other and then going down to the next level.
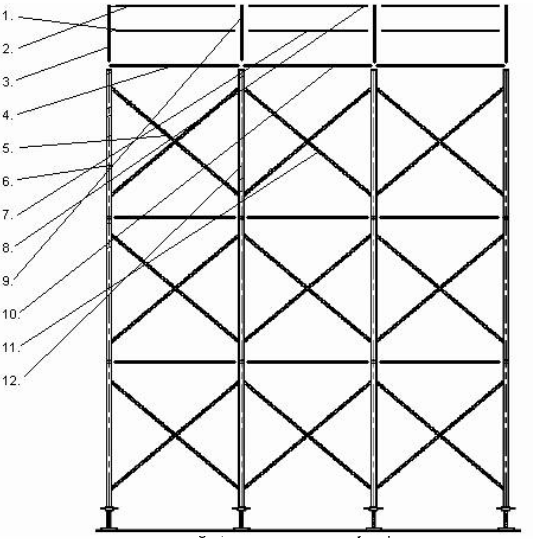
For a scaffold of this height, it will be necessary to position at least one scaffolder below the level being dismantled to enable components to be handed down safely.
7. STORAGE AND MAINTENANCE
7.1 When scaffold is not being used, it should be stacked in a neat and safe manner in a way that is not dangerous to passers by.
7.2 If scaffolding must be left in the weather, try to ensure it is stacked in such a way so as not to collect rainwater.
7.3 If you notice something wrong with any part of the scaffolding you should report it to your employer or the owner of the scaffold so it can be repaired or replaced. Stack damaged items separately.
7.4 Vertical tubes (standards) on scaffold frames should be cleaned regularly as they can become blocked with cement or other debris, which may obstruct the pins from going into the frames.
8. SCAFFOLD SAFETY
- Make sure you are wearing appropriate Personal Protective Equipment.
- Do not work on scaffolds outside during stormy or windy weather.
- Initially inspect the scaffold prior to mounting it.
- Do not lift any gear up on a scaffold using a pulley, block, hook or fitting that is visibly worn, cracked, rusted or otherwise damaged.
- Do not lift any gear up on a scaffold if the hoisting rope is frayed, torn or visibly damaged.
- Do not use any scaffold tagged “Out of Service or Scaffold Incomplete”
- Do not use unstable objects such as barrels, boxes, loose brick or concrete blocks to support scaffolds or planks.
- Do not use ladders, boxes, blocks or any object to gain extra height on a working platform. Have the scaffold height increased to reach the correct working level.
- Do not work on platforms on scaffolds unless they are fully planked.
- Do not use a scaffold unless guardrails and all planking are in place.
- Level a mobile scaffold after each move.
- Do not extend screw jacks more than 350mm.
- Do not climb the cross braces for access to the scaffold. Use a ladder.
- Do not jump from, to, or between scaffolding.
- Keep both feet on the decking.
- Do not sit or climb on the guardrails.
- Do not lean out from the scaffold.
- Do not attempt to rock the scaffold.
- Keep the scaffold and the working platform free of scraps, loose tools, tangled lines and other obstructions.
- Do not throw anything "overboard" unless a spotter is present. Use the chutes for debris or lower things by hoist or by hand.
- Chock the wheels of a mobile scaffold, using the wheel blocks, and lock the wheels by using your foot to depress the wheel locks on all wheels, before using the scaffold.